Part No. ASKW2400SX - Case 6-120506 - Installation Guide
Rack Installation
Step 1.
Loosen screw A on both sides to slide out and remove the two rear slide rails.
Loosen screw A on both sides to slide out and remove the two rear slide rails.
Step 2.
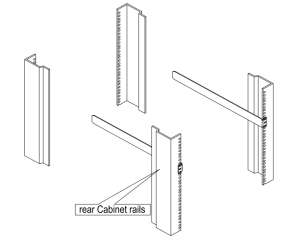
Attach the two rear slide rails to the rear vertical mounting rails of the rank cabinet using standard M6 cage nuts and screws.

Attach the two rear slide rails to the rear vertical mounting rails of the rank cabinet using standard M6 cage nuts and screws.
Step 3.
Position the LCD console drawer so the two rear slide rails will slide into the main body of the LCD
console drawer. Attach the mounting ears of the LCD console drawer to the front vertical mounting
rails of the rack cabinet using standard M6 cage nuts and screws.
Step 4.
Unlock Latch (B) to the left. Slide out along with the rail.
Step 5.
Unlock Latch (B) to the left again to lift up LCD.
Step 6.
Unlock Latch (C) to adjust screen angle by holding the handle (D) to the right
Step 7.
3. Adjust the latch (C) to stable LCD module at operating position
Step 8.
1. After operating, follow Step 7---> 6 ---> 5 ---> 4 to put away LCD model.
Operational Video
Related Articles
Flush Mount Installation Guide
Click the link below Flush Mount Installation GuideDRP3DW17TS-SD01 Rackmount Installation Guide
Click the link below DRP3DW17TS-SD01 Rackmount Installation GuideeGalax Touch Driver Installation Guide
Click the link below eGalax Touch Driver Installation GuideBrightness Setting Guide
Click the link below Brightness Setting GuidePart No.: DRP4W2150A-HB-HDMI - Case: 75864 - Question: Deployment Configuration?
Model: DRP4W2150A-HB-HDMI Rugged 4U 26" Deep 21.5" Quad Display Drawer Platform: Hydra Series Frame: 26" Deep LCD(s): (215HBx4) 4x21.5" FHD (1920x1080) LED Backlit High Bright Panels to 1500Nits Controller(s): aRGB/VGA, HDMI, Display Port Front: 4U ...